
Showing posts with label Custom ROM. Show all posts

Friday, July 3, 2020

// //

Android 10 Update for Moto G5 Plus with crDroid v6.7 ROM - Download + Guide

Android 10 update for Moto G5 Plus is now available for download. Continue reading this guide to learn the step-by-step installation guide along with files. Android 10 comes with improved features and better security than earlier Android versions. Moto G5 Plus comes with good hardware inside that can run Android 10 smoothly. In this article, we will flash a custom ROM called crDroid v6. This ROM is based on Android 10 AOSP and comes with various customization (features list) that you can't just avoid.

Related Reading: 
Android 10 comes with some of the newest ways to control your privacy, customise your phone, and get things done. You will experience, live caption, smart reply, sound amplifier, new gesture navigation, dark theme, and many more. 

As per crDroid developers, "crDroid is designed to increase performance and reliability over stock Android for your device also attempting to bringing many of the best features existent today."

If all this excites you then you can follow this guide to update your Moto G5 Plus to the latest Android 10 via custom ROM crDroid v6.

How to Update Moto G5 Plus to latest Android 9.0 Pie

Warning! We at ShizHub produce tutorial to help out fellow Android users but all this guide are educational purpose only. You should try this guide at your own risk. Neither we nor the developer should be responsible if your Android device experience damage after following this tutorial. Also remember, this guide is only applicable for Moto G5 Plus. Don’t try this guide in any other Android device. It may hard brick your device.

Prerequisite:

1. Installing custom ROM risk you mobile existing data, hence we recommend a backup before proceeding. You may follow our Android backup guide.

2. Make sure your device have at least 30% battery power.

3. You already have USB Driver installed for Moto G5 Plus in your PC. Windows OS usually download and install USB driver automatically when you connect your device first time. You can always manually download USB driver from our latest USB driver download page.

4. Make sure USB Debugging is enabled otherwise you won’t able to transfer file between PC and mobile. You can follow our USB Debugging enable guide.

5. You have TWRP Recovery 3.0 or higher installed. You can follow our guide: Unlock Moto G5 Plus & Install TWRP Recovery 3.2.3-1 - Easy Tutorial

If you did everything that we mentioned above then you are ready to follow step-by-step guide on how to install Android 10 based crDroid v6 ROM on Moto G5 Plus.

File Required(Download by clicking on it)
  1. crDroid v6 For Moto G5 Plus [Filename: crDroidAndroid-10.0-20200607-potter-v6.7.zip]
  2. Gapps [Filename: open_gapps-arm64-10.0-pico-20200613.zip]

How to Update Moto G5 Plus to latest Android 10 with crDroid v6 ROM

Step 1: Copy downloaded zip files to your device memory.

Step 2: Boot into recovery mode. To boot into recovery first turn off your Moto G5 Plus and then press and hold Volume Down and Power button together. On the next screen use Volume Down to scroll to recovery and then press Volume Up to select. You can also boot into recovery without key combination.

TWRP Recovery Screen

Step 3: Create a Backup using TWRP Backup Option.

TWRP Backup option

Step 4: Perform a Factory Reset (this will delete all apps and their settings and game progress). To do this, Tap on Wipe, then at the bottom of the screen do a Swipe on the ‘Swipe to factory reset‘ option.

TWRP Factory Reset

Step 5: Finally, its time to flash the ROM file. Tap on Install, then browse to the location where you saved the files and tap on the crDroid v6 zip file. Then tap on Add More Zips, and add Gapps zip. Now at the bottom of the screen, do a swipe on the Swipe to confirm flash option to begin flashing.

TWRP ROM Installation Screen

Step 6: When the installation is completed, go back to the main recovery menu and tap on Reboot and then, tap on System to reboot your Moto G5 Plus and boot up into Android 10 ROM crDroid v6. The first boot will take some time.

TWRP Reboot Screen

Returning to Previous ROM: To go back to your previous ROM, boot into recovery, select Backup then through Restore option, restore your previous ROM by selecting it from the list.

TWRP Restoring Backup Screen

    That's it! You now have the latest Android 10 based custom ROM crDroid v6 installed on your Moto G5 Plus. You can root this ROM by following this guide: 
    How to root Moto G5 Plus - Simple Safe Method.
    Read More

    Saturday, June 27, 2020

    // //

    Android 10 Update for Moto G 2015 with crDroid v6.7 ROM - Download + Guide

    Android 10 update for Moto G 2015 is now available for download. Continue reading this guide to learn the step-by-step installation guide along with files. Android 10 comes with improved features and better security than earlier Android versions. Moto G 2015 comes with good hardware inside that can run Android 10 smoothly. In this article, we will flash a custom ROM called crDroid v6. This ROM is based on Android 10 AOSP and comes with various customization (features list) that you can't just avoid.

    Android 10 comes with some of the newest ways to control your privacy, customise your phone, and get things done. You will experience, live caption, smart reply, sound amplifier, new gesture navigation, dark theme, and many more. 

    As per crDroid developers, "crDroid is designed to increase performance and reliability over stock Android for your device also attempting to bringing many of the best features existent today."

    If all this excites you then you can follow this guide to update your Moto G 2015 to the latest Android 10 via custom ROM crDroid v6.

    Moto G 2015 Android 10 Update

    Warning! We at ShizHub produce tutorial to help out fellow Android users but all this guide are educational purpose only. You should try this guide at your own risk. Neither we nor the developer should be responsible if your Android device experience damage after following this tutorial. Also remember, this guide is only applicable for Moto G 2015. Don’t try this guide in any other Android device. It may hard brick your device.

    Prerequisite:

    1. Installing custom ROM risk you mobile existing data, hence we recommend a backup before proceeding. You may follow our Android backup guide.

    2. Make sure your device have at least 30% battery power.

    3. You already have USB Driver installed for Moto G 2015 in your PC. Windows OS usually download and install USB driver automatically when you connect your device first time. You can always manually download USB driver from our latest USB driver download page.

    4. Make sure USB Debugging is enabled otherwise you won’t able to transfer file between PC and mobile. You can follow our USB Debugging enable guide.

    5. You have TWRP Recovery 3.0 or higher installed. You can follow our guide: Unlock Moto G 2015 & Install TWRP Recovery 3.2.3-0 - Easy Tutorial

    If you did everything that we mentioned above then you are ready to follow step-by-step guide on how to install Android 10 based crDroid v6 ROM on Moto G 2015.

    File Required(Download by clicking on it)
    1. crDroid v6 For Moto G 2015 [Filename: crDroidAndroid-10.0-20200612-osprey-v6.7.zip]
    2. Gapps [Filename: open_gapps-arm64-10.0-pico-20200613.zip]

    How to Update Moto G 2015 to latest Android 10 with crDroid v6 ROM

    Step 1: Copy downloaded zip files to your device memory.

    Step 2: Boot into recovery mode. To boot into recovery first turn off your Moto G 2015 and then press and hold Volume Down and Power button together. On the next screen use Volume Down to scroll to recovery and then press Volume Up to select. You can also boot into recovery without key combination.
    TWRP Recovery Screen

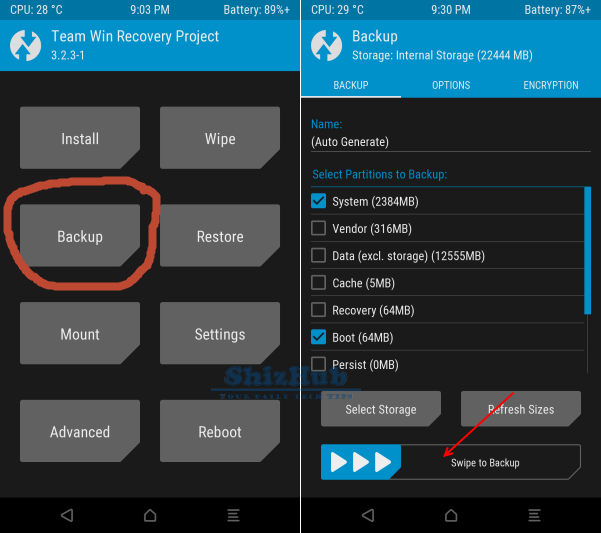
    Step 3: Create a Backup using TWRP Backup Option.

    TWRP Backup option

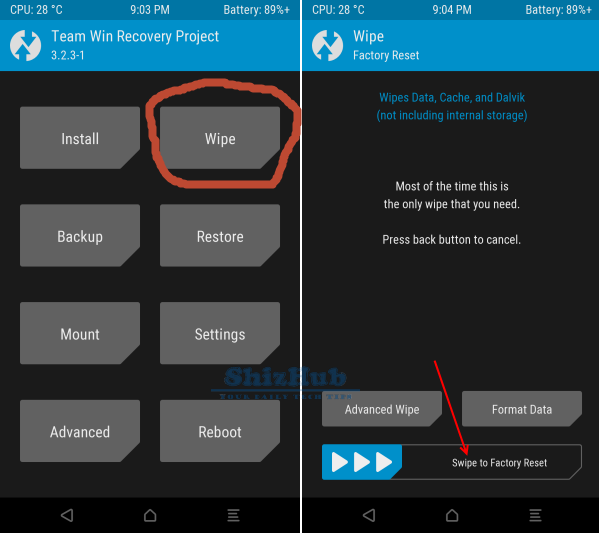
    Step 4: Perform a Factory Reset (this will delete all apps and their settings and game progress). To do this, Tap on Wipe, then at the bottom of the screen do a Swipe on the ‘Swipe to factory reset‘ option.

    TWRP Factory Reset

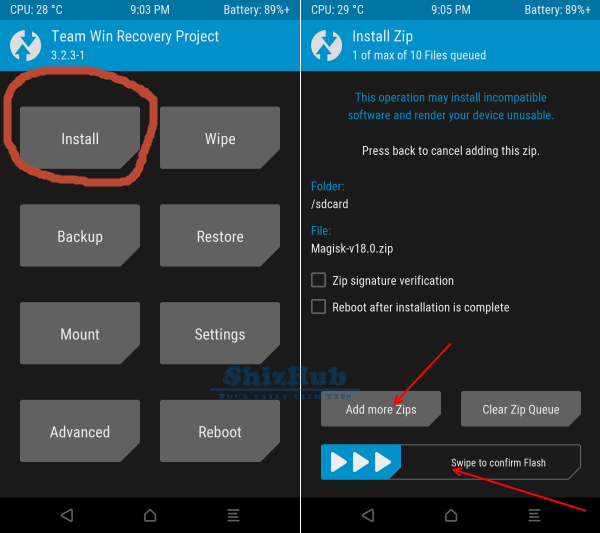
    Step 5: Finally, its time to flash the ROM file. Tap on Install, then browse to the location where you saved the files and tap on the crDroid v6 zip file. Then tap on Add More Zips, and add Gapps zip. Now at the bottom of the screen, do a swipe on the Swipe to confirm flash option to begin flashing.

    TWRP ROM Installation Screen

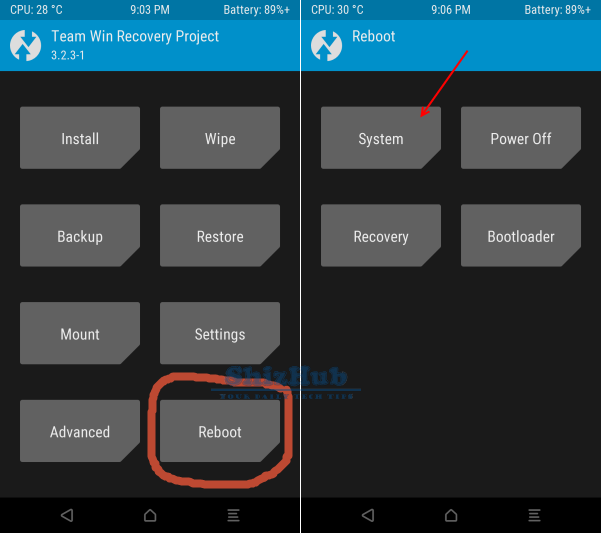
    Step 6: When the installation is completed, go back to the main recovery menu and tap on Reboot and then, tap on System to reboot your Moto G 2015 and boot up into Android 10 ROM crDroid v6. The first boot will take some time.

    TWRP Reboot Screen

    Returning to Previous ROM: To go back to your previous ROM, boot into recovery, select Backup then through Restore option, restore your previous ROM by selecting it from the list.

    TWRP Restoring Backup Screen

      That's it! You now have the latest Android 10 based custom ROM crDroid v6 installed on your Moto G 2015. You can root this ROM by following this guide: 
      How to root Moto G 2015 - Simple Safe Rooting Guide.
      Read More
      // //

      Update Moto G7 Power to latest Android 10 with crDroid v6.7 ROM - Tutorial

      A well-customized version of Android 10 is now available for Moto G7 Power. All thanks to crDroid ROM developer team. Read through the guide below to learn the step-by-step installation process along with the required files. As you know, Android 10 comes with improved features and better security than earlier Android versions. Moto G7 Power comes with good hardware inside that can run Android 10 smoothly. Hence it's a great idea to flash a custom ROM like crDroid v6 to enjoy maximum hardware capabilities. This ROM is based on the latest Android 10 AOSP and comes with various customization (features list) that you can't just avoid.

      Android 10 comes with some of the newest ways to control your privacy, customise your phone, and get things done. You will experience, live caption, smart reply, sound amplifier, new gesture navigation, dark theme, and many more. 

      As per crDroid developers, "crDroid is designed to increase performance and reliability over stock Android for your device also attempting to bringing many of the best features existent today."

      If all this excites you then you can follow this guide to update your Moto G7 Power to the latest Android 10 via custom ROM crDroid v6.

      Moto G7 Power Android 10 Update


      Warning! We at ShizHub produce tutorial to help out fellow Android users but all this guide are educational purpose only. You should try this guide at your own risk. Neither we nor the developer should be responsible if your Android device experience damage after following this tutorial. Also remember, this guide is only applicable for Moto G7 Power. Don’t try this guide in any other Android device. It may hard brick your device.

      Prerequisite:

      1. Installing custom ROM risk you mobile existing data, hence we recommend a backup before proceeding. You may follow our Android backup guide.

      2. Make sure your device have at least 30% battery power.

      3. You already have USB Driver installed for Moto G7 Power in your PC. Windows OS usually download and install USB driver automatically when you connect your device first time. You can always manually download USB driver from our latest USB driver download page.

      4. Make sure USB Debugging is enabled otherwise you won’t able to transfer file between PC and mobile. You can follow our USB Debugging enable guide.

      5. You have TWRP Recovery 3.0 or higher installed. You can follow our guide: Unlock Moto G7 Power & Install TWRP Recovery 3.4.0-0 - Easy Tutorial

      If you did everything that we mentioned above then you are ready to follow step-by-step guide on how to install Android 10 based crDroid v6 ROM on Moto G7 Power.

      File Required(Download by clicking on it)
      1. crDroid v6 For Moto G7 Power [Filename: crDroidAndroid-10.0-20200611-ocean-v6.7.zip]
      2. Gapps [Filename: open_gapps-arm64-10.0-pico-20200613.zip]

      How to Update Moto G7 Power to latest Android 10 with crDroid v6 ROM

      Step 1: Copy downloaded zip files to your device memory.

      Step 2: Boot into recovery mode. To boot into recovery first turn off your Moto G7 Power and then press and hold Volume Down and Power button together. On the next screen use Volume Down to scroll to recovery and then press Volume Up to select. You can also boot into recovery without key combination.
      TWRP Recovery Screen

      Step 3: Create a Backup using TWRP Backup Option.

      TWRP Backup option

      Step 4: Perform a Factory Reset (this will delete all apps and their settings and game progress). To do this, Tap on Wipe, then at the bottom of the screen do a Swipe on the ‘Swipe to factory reset‘ option.

      TWRP Factory Reset

      Step 5: Finally, its time to flash the ROM file. Tap on Install, then browse to the location where you saved the files and tap on the crDroid v6 zip file. Then tap on Add More Zips, and add Gapps zip. Now at the bottom of the screen, do a swipe on the Swipe to confirm flash option to begin flashing.

      TWRP ROM Installation Screen

      Step 6: When the installation is completed, go back to the main recovery menu and tap on Reboot and then, tap on System to reboot your Moto G7 Power and boot up into Android 10 ROM crDroid v6. The first boot will take some time.

      TWRP Reboot Screen

      Returning to Previous ROM: To go back to your previous ROM, boot into recovery, select Backup then through Restore option, restore your previous ROM by selecting it from the list.

      TWRP Restoring Backup Screen

        That's it! You now have the latest Android 10 based custom ROM crDroid v6 installed on your Moto G7 Power. You can root this ROM by following this guide: 
        How to root Moto G7 Power - Simple Safe Method.
        Read More
        // //

        Unlock Moto G7 Power & Install TWRP Recovery 3.4.0-0 - Easy Tutorial

        An easy guide to unlock Moto G7 Power and install the latest TWRP recovery, is now available at ShizHub. You probably already know, unlocking your smartphone/tablet is the first step to extract the complete juice of your device hardware. Once Moto G7 Power is unlocked, you can then easily install a custom recovery such as TWRP recovery, can root it using Magisk or SuperSu. Once rooted you can perform various system-related task which otherwise isn’t possible.

        How To Unlock and Install TWRP Recovery On Moto G7 Power


        WARNING: Unlocking the bootloader will erase all data on your device! Before proceeding, ensure the data you would like to retain is backed up to your PC and/or your Google account, or equivalent. We (ShizHub Team) are not responsible if anything happen to your device while following this tutorial.

        unlock and install twrp recovery

        Requirements:

        1. Make sure your computer has a working adb and fastboot. Setup instructions can be found here.
        2. Enable USB Debugging on your device. [Tutorial]
        3. A proper USB driver is installed. [Download]

        How To Unlock Moto G7 Power

        1. Enable OEM unlock in the Developer options under device Settings, if present.
        2. Once done, connect your device to your PC using a USB cable.
        3. Now on your computer open a command prompt (on Windows) or terminal (on Linux or macOS) window, and type: adb reboot bootloader . You can also boot your Moto G7 Power to fastboot mode by pressing Volume Down + Power when the device power is off. On the next screen use Volume Down to scroll to fastboot and then press Volume Up to select.
        4. To confirm the device is connected in fastboot mode or not, type: fastboot devices.
        5. Once confirmed, type the following command to know the bootloader status: fastboot oem device-info.
        6. If it confirms your bootloader isn't unlocked then follow the instructions at Motorola Bootloader Unlock Support to unlock your bootloader.
        7. Since the device resets completely, you will need to re-enable USB debugging for the next recovery installation process.

        How To Install TWRP Recovery 3.4.0-0 on Moto G7 Power

        1. Download TWRP.
        2. Once done, connect your device to your PC using a USB cable.
        3. Now on your computer open a command prompt (on Windows) or terminal (on Linux or macOS) window, and type: adb reboot bootloader . You can also boot your Moto G7 Power to fastboot mode by pressing Volume Down + Power when the device power is off. On the next screen use Volume Down to scroll to fastboot and then press Volume Up to select.
        4. To confirm the device is connected in fastboot mode or not, type: fastboot devices.
        5. Once confirmed, type the following command to flash TWRP Recovery: fastboot flash recovery twrp-x.x.x-x-ocean.img. [Note: Replace TWRP file name with your downloaded file name]
        6. The device should automatically reboot, if not then reboot it manually.

        Tip: To boot into recovery first turn off your Moto G7 Power and then press and hold Volume Down and Power button together. On the next screen use Volume Down to scroll to recovery and then press Volume Up to select.

        That’s it! You now have an unlocked Moto G7 Power with the latest supported TWRP Recovery installed.
        Read More
        // //

        Latest Android 10 Update for Meizu 16th with crDroid v6 ROM - Guide

        Are you looking for a way to update your Meizu 16th? Then you are in the right place. Android 10 update for Meizu 16th is now available for download. Read through the guide below to learn the step-by-step installation process along with the required files. As you know, Android 10 comes with improved features and better security than earlier Android versions. Meizu 16th comes with good hardware inside that can run Android 10 smoothly. To achieve our purpose, we will flash a custom ROM or firmware called crDroid v6. This ROM is based on Android 10 AOSP and comes with various customization (features list) that you can't just avoid.

        Android 10 comes with some of the newest ways to control your privacy, customise your phone, and get things done. You will experience, live caption, smart reply, sound amplifier, new gesture navigation, dark theme, and many more. 

        As per crDroid developers, "crDroid is designed to increase performance and reliability over stock Android for your device also attempting to bringing many of the best features existent today."

        If all this excites you then you can follow this guide to update your Meizu 16th to the latest Android 10 via custom ROM crDroid v6.

        Meizu 16th Android 10 Update


        Warning! We at ShizHub produce tutorial to help out fellow Android users but all this guide are educational purpose only. You should try this guide at your own risk. Neither we nor the developer should be responsible if your Android device experience damage after following this tutorial. Also remember, this guide is only applicable for Meizu 16th. Don’t try this guide in any other Android device. It may hard brick your device.

        Prerequisite:

        1. Installing custom ROM risk you mobile existing data, hence we recommend a backup before proceeding. You may follow our Android backup guide.

        2. Make sure your device have at least 30% battery power.

        3. You already have USB Driver installed for Meizu 16th in your PC. Windows OS usually download and install USB driver automatically when you connect your device first time. You can always manually download USB driver from our latest USB driver download page.

        4. Make sure USB Debugging is enabled otherwise you won’t able to transfer file between PC and mobile. You can follow our USB Debugging enable guide.

        5. You have an unlocked device and TWRP Recovery 3.0 or higher installed.

        If you did everything that we mentioned above then you are ready to follow step-by-step guide on how to install Android 10 based crDroid v6 ROM on Meizu 16th.

        File Required(Download by clicking on it)
        1. crDroid v6 For Meizu 16th [Filename: crDroidAndroid-10.0-20200609-m1882-v6.7.zip]
        2. Gapps [Filename: open_gapps-arm64-10.0-pico-20200613.zip]

        How to Update Meizu 16th to latest Android 10 with crDroid v6 ROM

        Step 1: Copy downloaded zip files to your device memory.

        Step 2: Boot into recovery mode. To boot into recovery first turn off your Meizu 16th and then press and hold the Power button until the screen goes blank, then press and hold the Volume Up button. Hold it until vibration and then release the Power button first, and after it releases the Volume Up button. You can also boot into recovery without key combination.
        TWRP Recovery Screen

        Step 3: Create a Backup using TWRP Backup Option.

        TWRP Backup option

        Step 4: Perform a Factory Reset (this will delete all apps and their settings and game progress). To do this, Tap on Wipe, then at the bottom of the screen do a Swipe on the ‘Swipe to factory reset‘ option.

        TWRP Factory Reset

        Step 5: Finally, its time to flash the ROM file. Tap on Install, then browse to the location where you saved the files and tap on the crDroid v6 zip file. Then tap on Add More Zips, and add Gapps zip. Now at the bottom of the screen, do a swipe on the Swipe to confirm flash option to begin flashing.

        TWRP ROM Installation Screen

        Step 6: When the installation is completed, go back to the main recovery menu and tap on Reboot and then, tap on System to reboot your Meizu 16th and boot up into Android 10 ROM crDroid v6. The first boot will take some time.

        TWRP Reboot Screen

        Returning to Previous ROM: To go back to your previous ROM, boot into recovery, select Backup then through Restore option, restore your previous ROM by selecting it from the list.

        TWRP Restoring Backup Screen

          That's it! You now have the latest Android 10 based custom ROM crDroid v6 installed on your Meizu 16th. 
          You can root this ROM by flashing magisk.
          Read More
          // //

          Android 10 Update for Meizu 16X with crDroid v6.7 ROM - Download + Guide

          A well-customized version of Android 10 is now available for Meizu 16X. All thanks to crDroid ROM developer team. Read through the guide below to learn the step-by-step installation process along with the required files. As you know, Android 10 comes with improved features and better security than earlier Android versions. Meizu 16X comes with good hardware inside that can run Android 10 smoothly. Hence it's a great idea to flash a custom ROM like crDroid v6 to enjoy maximum hardware capabilities. This ROM is based on the latest Android 10 AOSP and comes with various customization (features list) that you can't just avoid.

          Android 10 comes with some of the newest ways to control your privacy, customise your phone, and get things done. You will experience, live caption, smart reply, sound amplifier, new gesture navigation, dark theme, and many more. 

          As per crDroid developers, "crDroid is designed to increase performance and reliability over stock Android for your device also attempting to bringing many of the best features existent today."

          If all this excites you then you can follow this guide to update your Meizu 16X to the latest Android 10 via custom ROM crDroid v6.

          Meizu 16X Android 10 Update


          Warning! We at ShizHub produce tutorial to help out fellow Android users but all this guide are educational purpose only. You should try this guide at your own risk. Neither we nor the developer should be responsible if your Android device experience damage after following this tutorial. Also remember, this guide is only applicable for Meizu 16X. Don’t try this guide in any other Android device. It may hard brick your device.

          Prerequisite:

          1. Installing custom ROM risk you mobile existing data, hence we recommend a backup before proceeding. You may follow our Android backup guide.

          2. Make sure your device have at least 30% battery power.

          3. You already have USB Driver installed for Meizu 16X in your PC. Windows OS usually download and install USB driver automatically when you connect your device first time. You can always manually download USB driver from our latest USB driver download page.

          4. Make sure USB Debugging is enabled otherwise you won’t able to transfer file between PC and mobile. You can follow our USB Debugging enable guide.

          5. You have an unlocked device and TWRP Recovery 3.0 or higher installed.

          If you did everything that we mentioned above then you are ready to follow step-by-step guide on how to install Android 10 based crDroid v6 ROM on Meizu 16X.

          File Required(Download by clicking on it)
          1. crDroid v6 For Meizu 16X [Filename: crDroidAndroid-10.0-20200611-m1872-v6.7.zip]
          2. Gapps [Filename: open_gapps-arm64-10.0-pico-20200613.zip]

          How to Update Meizu 16X to latest Android 10 with crDroid v6 ROM

          Step 1: Copy downloaded zip files to your device memory.

          Step 2: Boot into recovery mode. To boot into recovery first turn off your Meizu 16X and then press and hold the Power button until the screen goes blank, then press and hold the Volume Up button. Hold it until vibration and then release the Power button first, and after it releases the Volume Up button. You can also boot into recovery without key combination.
          TWRP Recovery Screen

          Step 3: Create a Backup using TWRP Backup Option.

          TWRP Backup option

          Step 4: Perform a Factory Reset (this will delete all apps and their settings and game progress). To do this, Tap on Wipe, then at the bottom of the screen do a Swipe on the ‘Swipe to factory reset‘ option.

          TWRP Factory Reset

          Step 5: Finally, its time to flash the ROM file. Tap on Install, then browse to the location where you saved the files and tap on the crDroid v6 zip file. Then tap on Add More Zips, and add Gapps zip. Now at the bottom of the screen, do a swipe on the Swipe to confirm flash option to begin flashing.

          TWRP ROM Installation Screen

          Step 6: When the installation is completed, go back to the main recovery menu and tap on Reboot and then, tap on System to reboot your Meizu 16X and boot up into Android 10 ROM crDroid v6. The first boot will take some time.

          TWRP Reboot Screen

          Returning to Previous ROM: To go back to your previous ROM, boot into recovery, select Backup then through Restore option, restore your previous ROM by selecting it from the list.

          TWRP Restoring Backup Screen

            That's it! You now have the latest Android 10 based custom ROM crDroid v6 installed on your Meizu 16X. 
            You can root this ROM by flashing magisk.
            Read More
            // //

            Update Meizu X8 to latest Android 10 with crDroid v6.7 ROM - Tutorial

            You can now download and install the latest Android 10 update for Meizu X8.  However, this is not an official update but a custom one. Continue reading this guide to learn to require installation steps along with necessary files. Android 10 comes with improved features and better security than earlier Android versions. Meizu X8 comes with good hardware inside that can run Android 10 smoothly. In this article, we will flash a custom ROM called crDroid v6. This ROM is based on Android 10 AOSP and comes with various customization (features list) that you can't just avoid.
              Android 10 comes with some of the newest ways to control your privacy, customise your phone, and get things done. You will experience, live caption, smart reply, sound amplifier, new gesture navigation, dark theme, and many more. 

              As per crDroid developers, "crDroid is designed to increase performance and reliability over stock Android for your device also attempting to bringing many of the best features existent today."

              If all this excites you then you can follow this guide to update your Meizu X8 to the latest Android 10 via custom ROM crDroid v6.

              Meizu X8 Android 10 Update


              Warning! We at ShizHub produce tutorial to help out fellow Android users but all this guide are educational purpose only. You should try this guide at your own risk. Neither we nor the developer should be responsible if your Android device experience damage after following this tutorial. Also remember, this guide is only applicable for Meizu X8. Don’t try this guide in any other Android device. It may hard brick your device.

              Prerequisite:

              1. Installing custom ROM risk you mobile existing data, hence we recommend a backup before proceeding. You may follow our Android backup guide.

              2. Make sure your device have at least 30% battery power.

              3. You already have USB Driver installed for Meizu X8 in your PC. Windows OS usually download and install USB driver automatically when you connect your device first time. You can always manually download USB driver from our latest USB driver download page.

              4. Make sure USB Debugging is enabled otherwise you won’t able to transfer file between PC and mobile. You can follow our USB Debugging enable guide.

              5. You have an unlocked device and TWRP Recovery 3.0 or higher installed.

              If you did everything that we mentioned above then you are ready to follow step-by-step guide on how to install Android 10 based crDroid v6 ROM on Meizu X8.

              File Required(Download by clicking on it)
              1. crDroid v6 For Meizu X8 [Filename: crDroidAndroid-10.0-20200611-m1852-v6.7.zip]
              2. Gapps [Filename: open_gapps-arm64-10.0-pico-20200613.zip]

              How to Update Meizu X8 to latest Android 10 with crDroid v6 ROM

              Step 1: Copy downloaded zip files to your device memory.

              Step 2: Boot into recovery mode. To boot into recovery first turn off your Meizu X8 and then press and hold the Power button until the screen goes blank, then press and hold the Volume Up button. Hold it until vibration and then release the Power button first, and after it releases the Volume Up button. You can also boot into recovery without key combination.
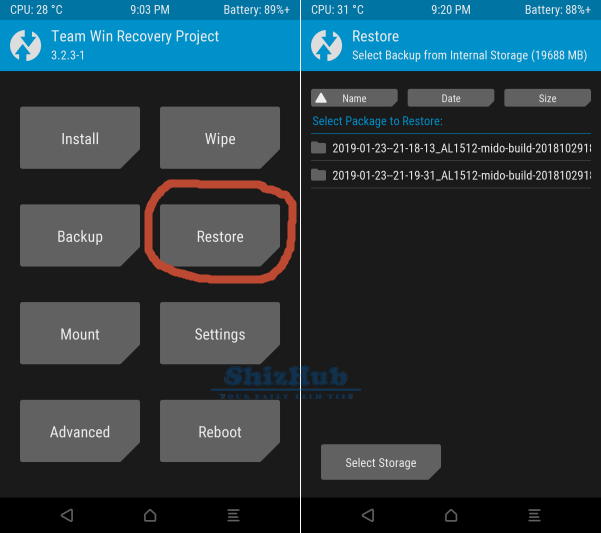
              TWRP Recovery Screen

              Step 3: Create a Backup using TWRP Backup Option.

              TWRP Backup option

              Step 4: Perform a Factory Reset (this will delete all apps and their settings and game progress). To do this, Tap on Wipe, then at the bottom of the screen do a Swipe on the ‘Swipe to factory reset‘ option.

              TWRP Factory Reset

              Step 5: Finally, its time to flash the ROM file. Tap on Install, then browse to the location where you saved the files and tap on the crDroid v6 zip file. Then tap on Add More Zips, and add Gapps zip. Now at the bottom of the screen, do a swipe on the Swipe to confirm flash option to begin flashing.

              TWRP ROM Installation Screen

              Step 6: When the installation is completed, go back to the main recovery menu and tap on Reboot and then, tap on System to reboot your Meizu X8 and boot up into Android 10 ROM crDroid v6. The first boot will take some time.

              TWRP Reboot Screen

              Returning to Previous ROM: To go back to your previous ROM, boot into recovery, select Backup then through Restore option, restore your previous ROM by selecting it from the list.

              TWRP Restoring Backup Screen

                That's it! You now have the latest Android 10 based custom ROM crDroid v6 installed on your Meizu X8. You can root this ROM by flashing 
                magisk.
                Read More
                // //

                How to Update Lenovo Z5 Pro GT to latest Android 10 with crDroid v6.7 ROM - Complete Guide

                Are you looking for a way to update your Lenovo Z5 Pro GT? Then you are in the right place. Android 10 update for Lenovo Z5 Pro GT is now available for download. Read through the guide below to learn the step-by-step installation process along with the required files. As you know, Android 10 comes with improved features and better security than earlier Android versions. Lenovo Z5 Pro GT comes with good hardware inside that can run Android 10 smoothly. To achieve our purpose, we will flash a custom ROM or firmware called crDroid v6. This ROM is based on Android 10 AOSP and comes with various customization (features list) that you can't just avoid.

                Android 10 comes with some of the newest ways to control your privacy, customise your phone, and get things done. You will experience, live caption, smart reply, sound amplifier, new gesture navigation, dark theme, and many more. 

                As per crDroid developers, "crDroid is designed to increase performance and reliability over stock Android for your device also attempting to bringing many of the best features existent today."

                If all this excites you then you can follow this guide to update your Lenovo Z5 Pro GT to the latest Android 10 via custom ROM crDroid v6.

                Lenovo Z5 Pro GT Android 10 Update


                Warning! We at ShizHub produce tutorial to help out fellow Android users but all this guide are educational purpose only. You should try this guide at your own risk. Neither we nor the developer should be responsible if your Android device experience damage after following this tutorial. Also remember, this guide is only applicable for Lenovo Z5 Pro GT. Don’t try this guide in any other Android device. It may hard brick your device.

                Prerequisite:

                1. Installing custom ROM risk you mobile existing data, hence we recommend a backup before proceeding. You may follow our Android backup guide.

                2. Make sure your device have at least 30% battery power.

                3. You already have USB Driver installed for Lenovo Z5 Pro GT in your PC. Windows OS usually download and install USB driver automatically when you connect your device first time. You can always manually download USB driver from our latest USB driver download page.

                4. Make sure USB Debugging is enabled otherwise you won’t able to transfer file between PC and mobile. You can follow our USB Debugging enable guide.

                5. You have TWRP Recovery 3.0 or higher installed. 

                If you did everything that we mentioned above then you are ready to follow step-by-step guide on how to install Android 10 based crDroid v6 ROM on Lenovo Z5 Pro GT.

                File Required(Download by clicking on it)
                1. crDroid v6 For Lenovo Z5 Pro GT [Filename: crDroidAndroid-10.0-20200619-heart-v6.7.zip]
                2. Gapps [Filename: open_gapps-arm64-10.0-pico-20200613.zip]

                How to Update Lenovo Z5 Pro GT to latest Android 10 with crDroid v6 ROM

                Step 1: Copy downloaded zip files to your device memory.

                Step 2: Boot into recovery mode. To boot into recovery first turn off your Lenovo Z5 Pro GT and then press and hold Volume DownVolume Up, and Power button together. You can also boot into recovery without key combination.
                TWRP Recovery Screen

                Step 3: Create a Backup using TWRP Backup Option.

                TWRP Backup option

                Step 4: Perform a Factory Reset (this will delete all apps and their settings and game progress). To do this, Tap on Wipe, then at the bottom of the screen do a Swipe on the ‘Swipe to factory reset‘ option.

                TWRP Factory Reset

                Step 5: Finally, its time to flash the ROM file. Tap on Install, then browse to the location where you saved the files and tap on the crDroid v6 zip file. Then tap on Add More Zips, and add Gapps zip. Now at the bottom of the screen, do a swipe on the Swipe to confirm flash option to begin flashing.

                TWRP ROM Installation Screen

                Step 6: When the installation is completed, go back to the main recovery menu and tap on Reboot and then, tap on System to reboot your Lenovo Z5 Pro GT and boot up into Android 10 ROM crDroid v6. The first boot will take some time.

                TWRP Reboot Screen

                Returning to Previous ROM: To go back to your previous ROM, boot into recovery, select Backup then through Restore option, restore your previous ROM by selecting it from the list.

                TWRP Restoring Backup Screen

                  That's it! You now have the latest Android 10 based custom ROM crDroid v6 installed on your Lenovo Z5 Pro GT. You can root this ROM by flashing magisk.
                  Read More